Treating Founder (Chronic Laminitis) without Horseshoes, Section 14
Faster-loading version with "thumbnail" photos
(Click on small photos to see larger versions)
Trimming a foundered foot at the June 26-9, 1999 Strasser Clinic
I do not claim to be an expert on the Strasser method, but this is what I observed in the clinic. It may not be a perfect representation of Dr. Strasser's ideas, but it's a start!
This section describes some refinements in trimming. It is better information than my earlier work trimming Max! It is remarkable that I was still getting improvements doing an incorrect barefoot trim. If only I had known earlier what I know now, I am sure we would have progressed faster.
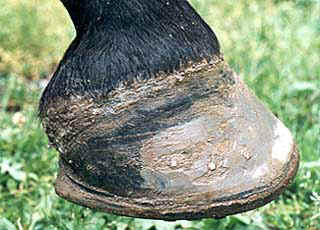
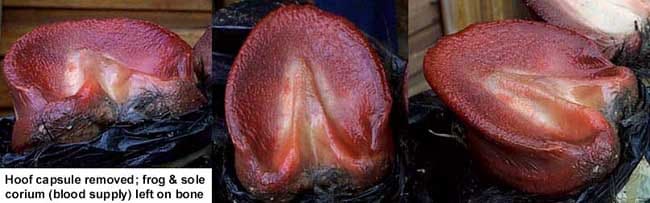
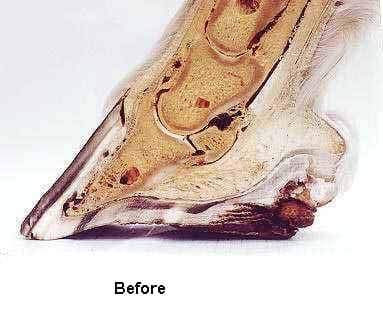
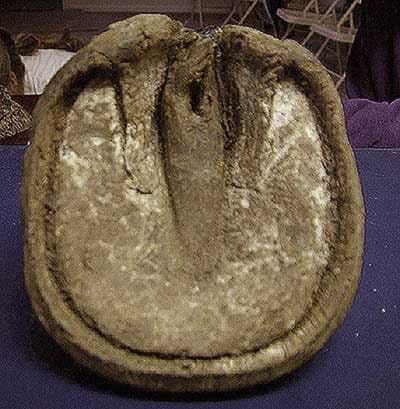
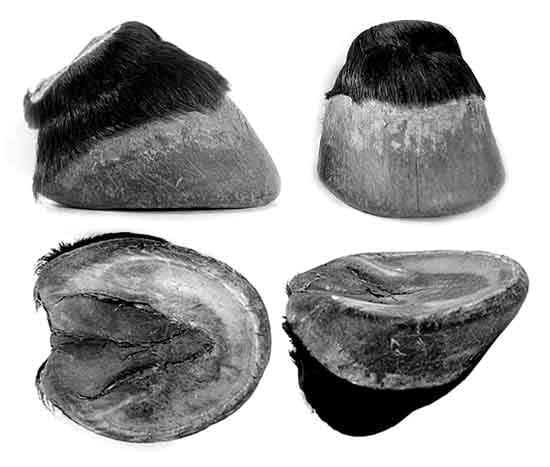
Foundered cadaver foot, "Before" being trimmed in Strasser class
(Photos courtesy of Sabine Kells)
Shoe removed, prior to trimming.
Notice extreme heel contraction, a common effect of shoeing,
especially heartbars when they are nailed on further back..
(Photo courtesy of Sabine Kells)
This horse's feet were among the many dead feet we had to practice on at the Strasser clinic. Although he had the orthodox treatment--heartbars--he still had excessively high heels. An attempt was made to fill crumbling horn with some synthetic material.
The fact that he ended up at the slaughter house, the source of the dead feet we worked on, suggests that the heartbars did not save him. The photo below shows that he had quite a bit of internal damage.
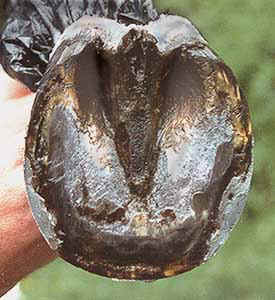
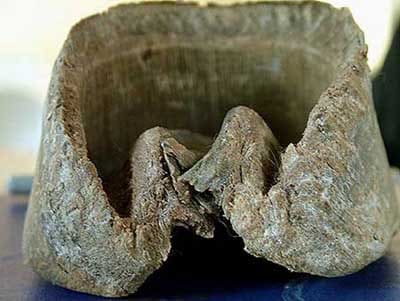
Foundered cadaver foot dissected after trim.
(Photo courtesy of Sabine Kells)
This is a dissection of the foot AFTER it was trimmed in the clinic. If the heels were left higher, as they were when he was shod, the tip of the coffin bone would be pointing right into the sole. This shoeing had not prevented rotation and a bulged sole. You can see the laminae are being torn away, and the tip of the coffin bone was de-mineralizing.
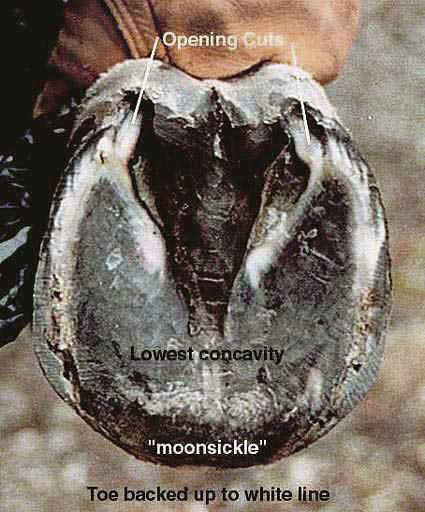
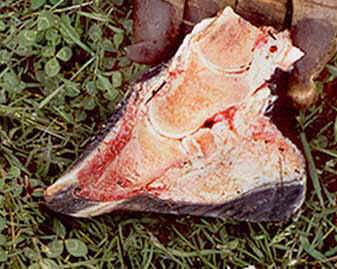
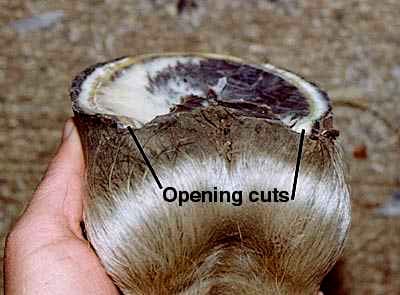
Foundered Foot properly trimmed.
(Photo courtesy of Shelley Kayser)
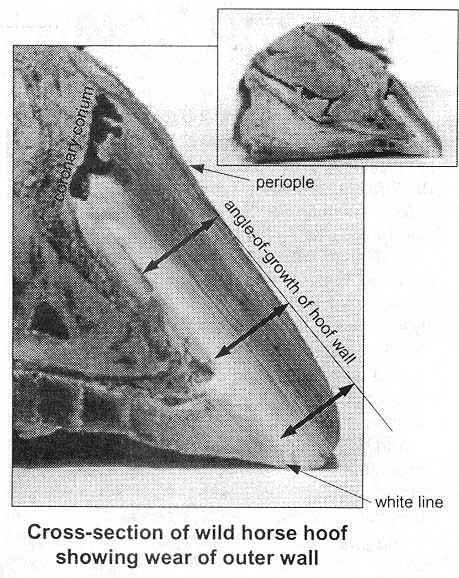
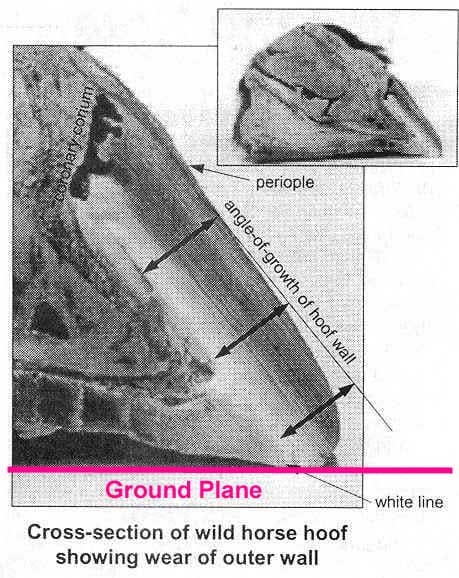
1. The heels are lowered considerably, near to where the periople ends on the heel walls, and "opening cuts" are done to encourage heel spreading. After putting opening cuts on a hoof with properly lowered heels, I can actually move the heels apart slightly using both my thumbs, pressing hard. If you can see a slight spreading of the heel bulbs when the horse puts weight down on the foot, you have hoof mechanism--crucial to increasing circulation.
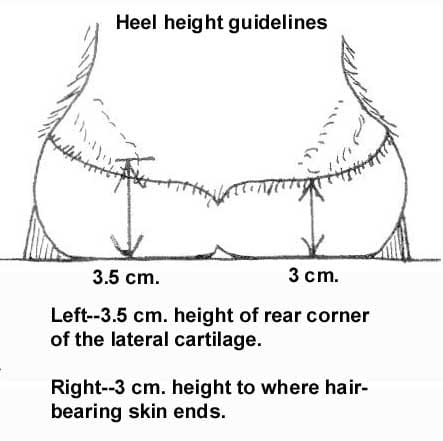
The above drawing by Sabine Kells (with text added by me) shows two alternative methods of determining heel height on an average-sized hoof. On the left, the 3.5 cm. height of the top of the lateral cartilage where it ends in the rear. On the right, the alternative standard of a 3 cm. height under where the lateral cartilage ends below where the hair-bearing skin ends. Note: for the 3 cm. measurement on right, do not measure where the hair itself ends; this is too variable, and also would result in high heels. Measure from where the hair follicles in the skin end.
For a working horse, I might go with a 4 cm. heel height, or 5 mm. higher overall, than the above two standards. In the case of minis and ponies, your measurements will be a little less than the 3.5 cm. standard.
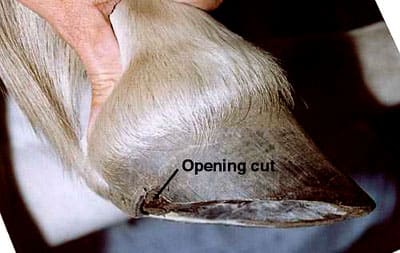
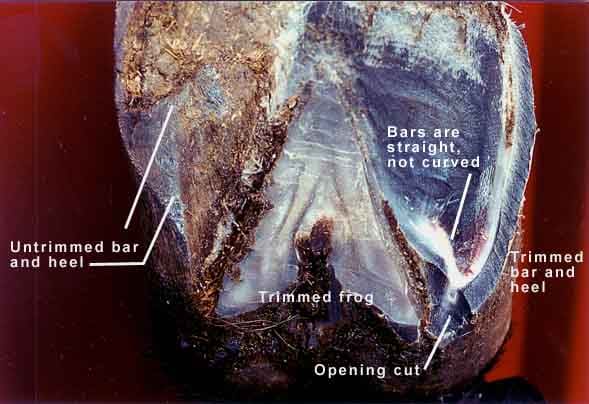
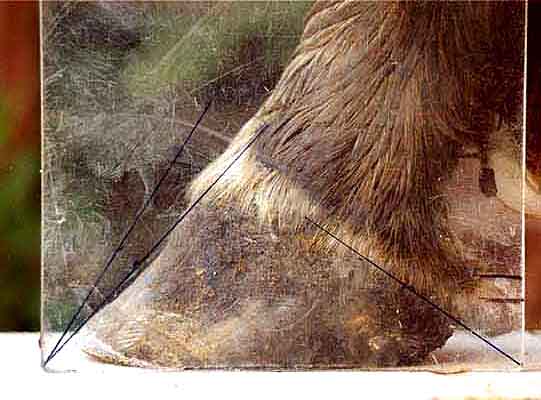
Opening cuts for moderately contracted hooves--Draw lines from the apex of the frog on back, coming out the back of the foot near the outsides of the heel bulbs. Any heel and bar horn inside these lines needs to be lowered so that it is not weightbearing--we want the the walls to bear weight in the heels outside these lines. Be sure to go all the way to the end of the point where heel and bar wall meet, even if it is partially covered by the frog. These cuts can be rather wide, but don't go deeper than when things just begin to get pink. These cuts must be refreshed often to remain effective. (Opening cuts on hooves severely contracted hooves that are wider on top than at the ground plane is a more complicated topic, which I am not going into here.) Please do not attempt opening cuts on horses that are not free to move about at all times.
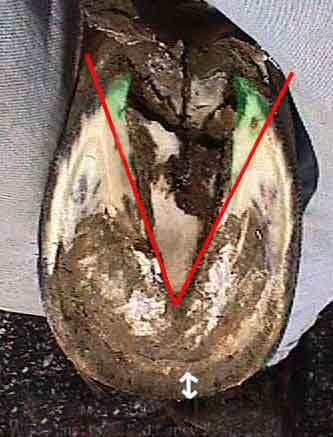
Opening cuts--the green area between the red lines should be shortened
so weightbearing is outside the red lines in heel area.
Red lines exit on outsides of heel bulbs.
You do not do opening cuts unless the foot is contracted. However, most hooves that have been shod any length of time are contracted.
WARNING! Opening cuts can actually promote more contraction, not less, if the horse is living on soft footing! For opening cuts to work, you need firmer footing. If the horse is on soft footing most of the time, don't do them.
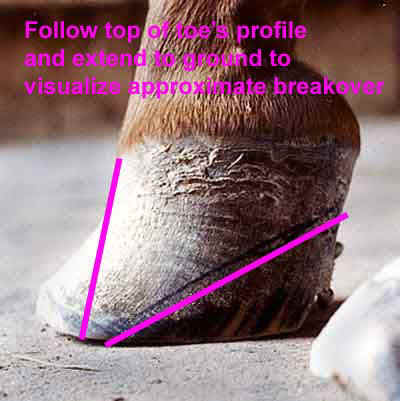
ALSO--if the breakover is too far forward, you are likely to have contraction despite doing opening cuts. You need to keep the toes backed up to spread heels, too. Letting toes get slippered forward tends to contract heels.

Properly trimmed foundered foot
(Photo courtesy of Shelley Kayser)
More opening cut photos on a formerly foundered pony
being trimmed by Sabine Kells.
Please note that the above foot has the sole and frog trimmed quite a bit. When you place a straight edge across the heels from side to side, the frog, soles and bars should not protrude past the heel and quarter walls. The back 1/3 of the frog is level with the heels; the front 2/3 is lower. The bars are taken down quickly, and merge with the sole half-way forward alongside the frog.
It is a common error to think, with a rotated foot, that you need to leave every bit of sole on. While this is true in the toe area, it is not towards the back of the foot. The following foot was only being leveled with a rasp--because of earlier sole penetration the owner was afraid to concave out the back of the foot. I point out on the image where the sole penetration had been earlier. The excess sole, bars and frog horn made any hoof mechanism impossible in the hoof below:
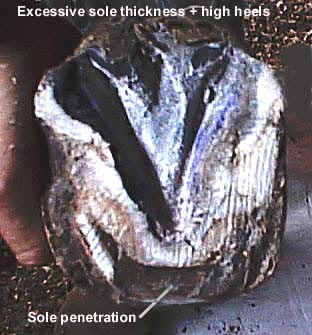
Excessive sole in heels and quarters; bars and heels too high.
Another common mistake is to not take the bars down enough:
This is an example of "folded over" bars--
these over-long bars are jamming themselves into the sole.
(Photo courtesy of Shelley Kayser)

Here is an even worse example of bars flopped over onto
their sides and pressing into the sole, causing bruising below.
Note very contracted heels. (Photo courtesy of Yvonne Welz)
Showing what high heels and bars result in--
contracted hooves, and enough extra crowding
and pressure inside the hoof to cause "navicular syndrome."
Normal hoof left--Contracted hoof right
(Photo courtesy of Sabine Kells)
Many hooves have high heels and folded-over bars. The pressure on the sole corium from these hard, folded-over bars did not enable much sole to grow under them. When you reduce these bars, the sole can be very thin under these folded-over bars. For working on a live horse with this situation, Dr. Strasser recommends only taking down the folded over bars to the bar's white line for the first trim (in other words, only thin half of its thickness the first trim), and then subtly shaving a little more off every few days, giving the foot a chance to grow some sole in the bar/heel triangle so you don't trim straight down to corium on a first trim if the overlaid bar has prevented sole growth in this area before it is thinned out.
(Photos courtesy of Jenny Edwards)
Visit her web site at www.all-natural-horse-care.com
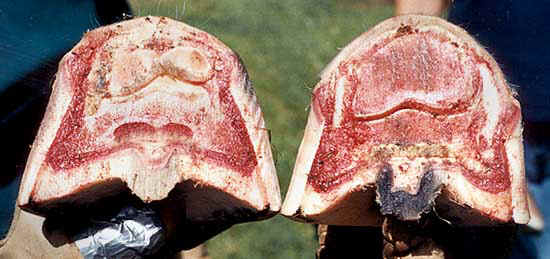
The dissection photos above show a hoof capsule removed, with the frog and sole corium (sole blood supply) still covering the coffin bone. A trim that follows the form of these internal structures is uniformly encapsulating the coffin bone and resulting in a consistent sole thickness throughout. Getting a consistent sole thickness may not be possible where a tilted coffin bone has thinned the sole in the toe area, but it is something to aim for. Uniformly encapsulating the coffin bone also implies getting its bottom ground-parallel. It also implies backing up the toe if the hoof capsule's toe is stretched forward.
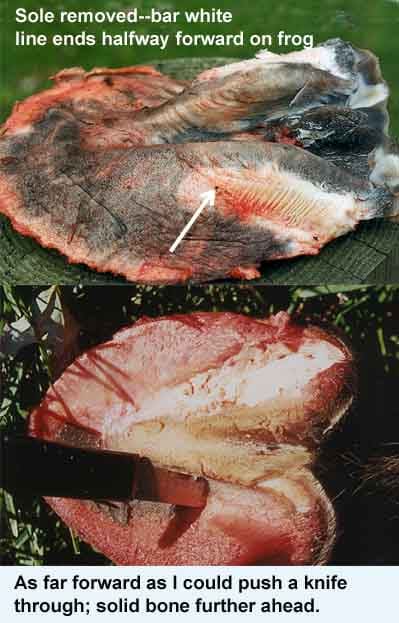
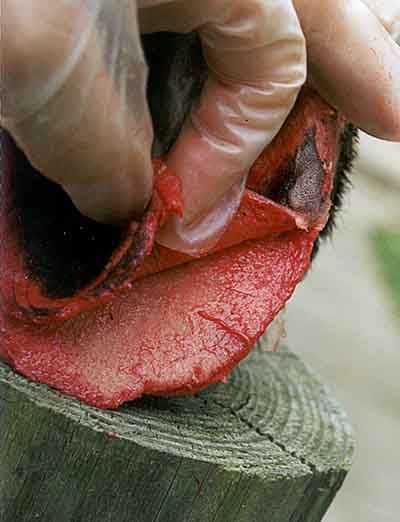
Note in this dissection photo (above) that the bar white line ENDS halfway forward on frog. I cannot push my knife through the hoof capsule ahead of this point, because I hit bone further ahead. Behind this point is softer tissue that cushions the corium (blood supply) instead of crushing it between hard bone and hard bar horn. The corium (blood supply) is a delicate layer of tissue, shown being peeled off the coffin bone in the dissection below:
2. No sole was taken off in the toe area--a "moonsickle"-shaped sole callous is encouraged to develop by doing this over time . Concaving out of the sole was only done at the very most 1/2" ahead of the tip of the frog--IF there is rotation. Concaving the sole--once the sole is pared, carefully, to where the frog and sole join, eliminating a deep crevice between them, along the front half of the frog only, then you taper the sole out to the sides. (If there is no rotation, you would concave out the sole to the moonsickle, which is begins about half-way between the tip of the frog and the toe wall.
After you have finished concaving the sole, be sure to check BY FEEL for lumps and high spots. In other words, close your eyes and run a finger over the whole sole. Lumps will feel like "rocks in your socks" to the horse. We want a uniform thickness of sole that follows the contours of the coffin bone bottom it covers. Lumps and raised spots create painful pressure points.
3. Bars were lowered to merge with the sole about half-way forward in relationship to the frog. They end half-way forward alongside the frog, after the frog/sole juncture has first been cleaned out, the first step in trimming. (See above illustrations) The foot below had the bars trimmed out nicely:
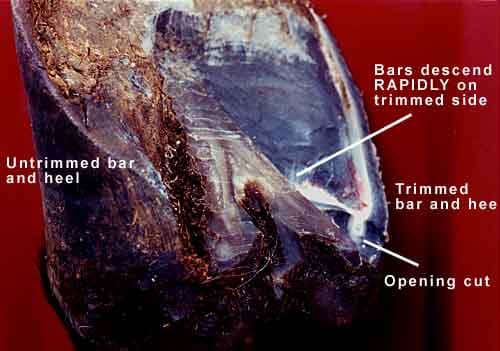
Good bar trim
This cadaver foot was trimmed on one side by Sabine Kells.
Note how rapidly the bar descends, and that it is a straight line.
(If the line is curved, it is still folded over and too high.)
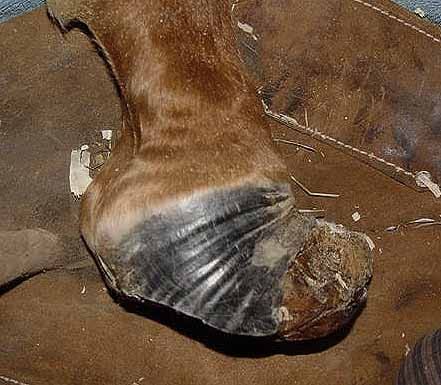
Severely over-grown bars, covering most of sole!
Notice that the small triangle of sole between the bar and outside wall (seat of the corns) is actually a little lower than the bar. Too much sole left in this area often results in bulged up hairlines, indicating that the lateral cartilage is being jammed up into the hoof capsule.
Sometimes you have a thin layer of bar left in this area even if you pare it out some. This harder bar horn will crush out the softer sole horn that should be growing here.
Of the horses I have seen, and the photos submitted to me, the most common mistake I see is not going after the bars and seat of the corns enough. Another common mistake is leaving a ridge of hard, bar horn alongside the frog, and paring out the sole deeper outside of this. The frog/sole juncture should be the deepest point of concavity.
4. Lowering the heels enough will usually result in the frog protruding past the walls. It must be taken down so that the back one third of the frog is flush with the heels-- a straight edge across the heels must not rock over the frog!--and so the tip of the frog is actually lower than a straight edge across the hoof at the tip of the frog.
5. When you lay a straight edge across the foot just in front of the tip of the frog, ideally the concavity should measure about 1 cm. The short toes I had been putting on Max at one point made this impossible....a common mistake. It is often hard to get this much concavity in a foundered foot. But shortening the toes from the bottom will usually make this impossible. Having the toes too short is a common mistake, and I was making it for a while.
6. The toes are backed up using a vertical rasp cut....IF there is rotation, or rotation is expected (long toe or weak white line), or an angle correction is needed. While in more normal hooves backing up breakover to the white line is often all that is needed, there ARE times when backing up breakover needs to go behind the white line, though. Breakover is positioned in relationship to where the coffin bone is, not where the white line or the water line are. For more info on backing up breakover, CLICK HERE Backing up breakover reduces the toe leverage pulling the laminar connection apart. The safest approach is to have lateral x-rays to see just where the coffin bone is positioned inside the hoof capsule. A familiarity with the proportions of the hoof's internal structure, based on doing dissections and viewing x-rays, can get you pointed in the right direction, but x-rays are a more certain approach.
(Heels still could be a bit lower here, and toes backed up more.)
7. There is a subtle scooping of the quarters, to give maybe 1/16" clearance. This scoop is between the weight-bearing area of the heels and the beginning of the moonsickle. The hoof below is not rotated, so the scooping is done a little further forward than you can afford to do it on a rotated hoof. On a rotated hoof, you have to keep the scooping further back so you don't lose vertical toe height.
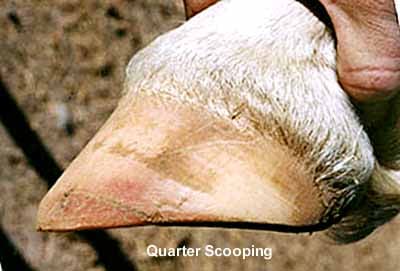
Courtesy of Yvonne Welz. The year before, Inty's LH (above) was foundered.
Most foundered feet need to have shallower scoops, further forward, in order to not lose 'vertical toe height.'
This foundered hoof has a shorter quarter scoop
to not sacrifice vertical toe height.
(Photo, Viv MacFarlane)
Here is an illustration of what vertical toe height is:
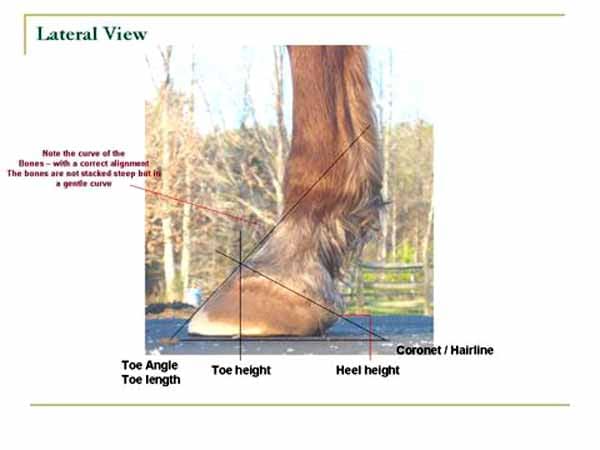
(Photo, Risa Couch)
When a hoof is foundered, or if the toe has been over-shortened on the bottom of the toe habitually, the quarter scoops need to end further back, and to be shallower, in order to not lose vertical toe height and reduce hairline slope.
8. Lateral balance--the hairlines, when viewed from ground level and dead center of the hoof, should be parallel to the ground.
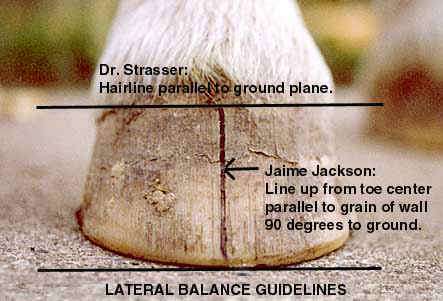

Above: good lateral balance. (Max right hind)
Below: poor lateral balance. (Courtesy of Cindy Sullivan)
9. As I now understand it, one of our major trimming goals is to trim in a way to get the bottom of the coffin bone ground-parallel. Not tipped too low in the front, which is the most common scenario. Not tipped to one side, as it does when the lateral balance is off. (A common lateral trimming error is the inside wall is too high.) Trimming to get the bottom of the coffin bone ground-parallel prevents bruising of the sole and corium, and enables sounder sole horn to grow. When the coffin bone is slicing into one area of the sole, you get bruising and "inflammation horn," which feels softer, and is lower quality. The hairlines give us a valuable gauge in doing this. X-rays are highly desirable to check this, but the hairlines are a good outward indication and starting point.
Max's heels need to come down a tad more here. (Right hind)
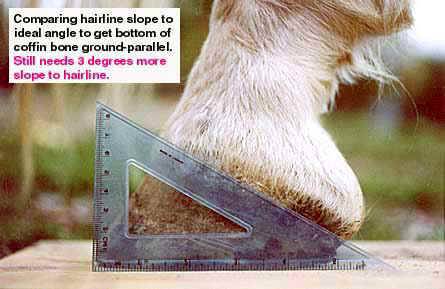
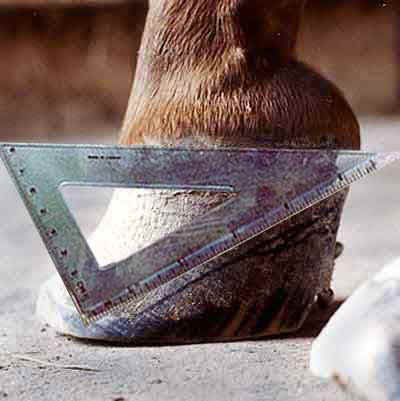
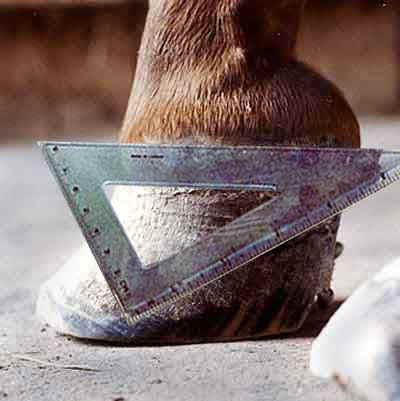
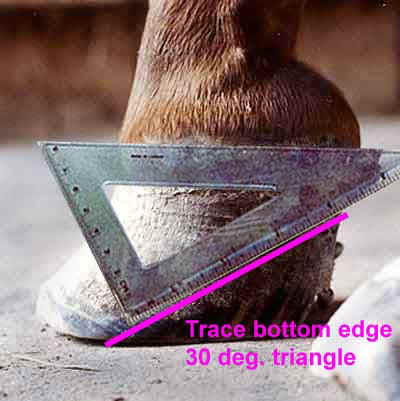
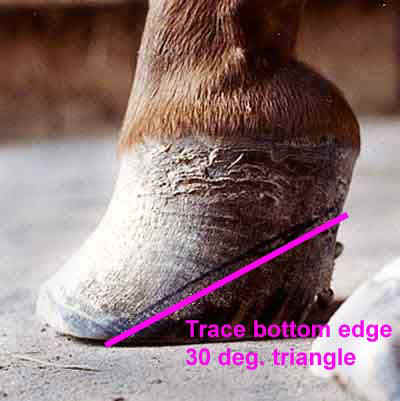
We want a 30 degree hairline slope.
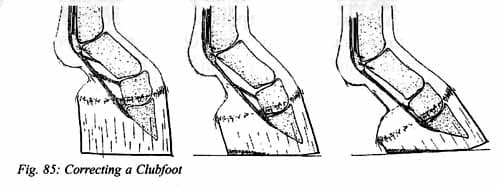
What if you want to lower the heels and get a 30 degree hairline slope...but there isn't enough thickness on the bottom of the toe? Then you 'float' the toes, like in this illustration from Dr. Strasser on correcting a club foot. A club foot just isn't rotated...yet. But floating the toe is still the solution. It may take a while for enough sole and wall to fill in on the bottom of the toe, but at least the coffin bone will be in a better position. This illustration is a little misleading, as it does not show the wings of the coffin bone...which ARE ground-parallel in the last picture:
I can see I was making many mistakes on Max earlier! The photo below is one of the first that I sent to Sabine Kells after I read Dr. Strasser's book. Needless to say, Sabine got after me about his heels being too high. While Max was doing pretty well at the time this photo was taken, he was not doing as well on gravel and frozen ground as he has after I lowered his heels. Lowering the heels gradually resulted in harder, thicker sole horn growing in his toe area. Initially it got him very sore when I lowered his heels and worked on getting them to spread, and resulted in some abscessing. In the long run, it was worth doing, though.

Max's hairlines were almost parallel to the ground March, 1999....no good!
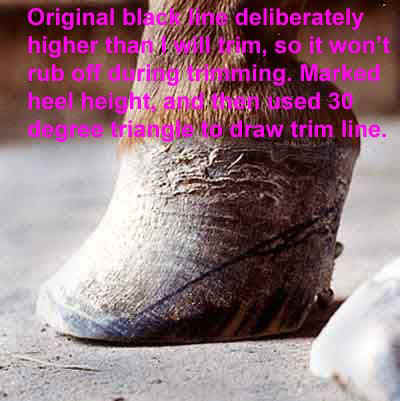
I was trying to plug in toe length and angle specs in the photo above. For a much more effective way to zero in on where to trim a foundered foot, Please click on Section 20 By marking a reasonable heel height, and then using a 30 degree triangle to mark where to trim the bottom of the foot safely, I got much better results. Trying to use toe length and angle specs...or trying to use live sole plane as my landmark for where to trim...would have not worked as well in such a severe case.
To see A video of how I marked where to trim on the very distorted foot shown above (in Section 20)--slower download because it's a 328K file size--Click HERE
The hairlines should slope downwards in the back. X-Ray of "Babe," which shows how short toes and high heels make the coffin bone tip point into the ground.
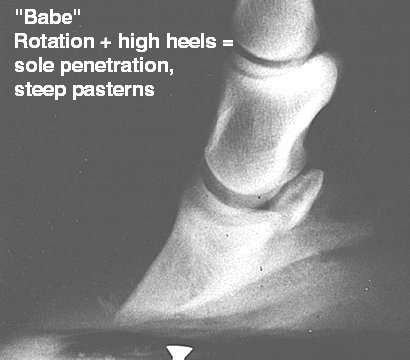
By lowering the heels enough to get the tip of the coffin bone and its wings more nearly ground-parallel, you relieve this pressure point on the sole, which often results in poor-quality "inflammation horn," and at worst results in sole penetration. I need to get considerably more slope to the hairlines here. I have been working on this since the clinic!
When I started attacking Max's hairlines not sloping enough (when viewed from the side), I noticed the sole horn in his toe area quickly began to get harder.
10. Re getting harder soles: many people get the soles harder painting on iodine, or a 50/50 strong iodine/formaldehyde solution. It does help. However, resorting to toxic chemicals is unnecessary if you get the bottom of the coffin bone ground-parallel, restoring circulation to the solar corium, which enables the sole horn to grow in thicker and harder in the toe area. Also, many people are finding that soaking hooves in a weak solution of apple cider vinegar and water, like a 1:8 mix, toughens hooves, too, without toxic effects.
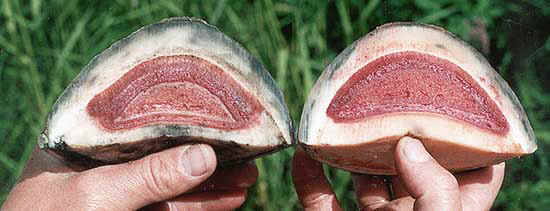
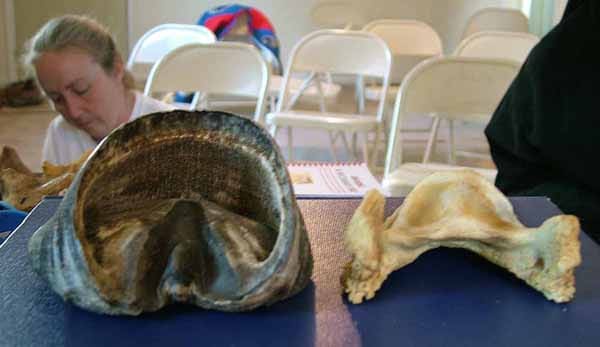
Foundered foot on left shows how the coffin bone has rotated
and is jamming into the sole. Normal foot on right.
Coffin bone is compressing the sole corium, reducing circulation.
This reduced circulation in the toe of the sole enables sole penetration.
It also results in thinner, softer soles in the toe area...and ouchy feet.
(Photo courtesy of Sabine Kells)
Once you DO get harder soles--they sure can be hard to trim! Yvonne Welz tells me that her husband has been using one of those little Dremel grinders to shape Inty's soles because they have gotten too hard to trim with a hoof knife. A RotoZip, which resembles a giant version of a Dremel, is even more effective. Other people have reported having to soak feet for a while to make trimming them possible. It's a nuisance when you're trying to trim, but it is this same hardness and strength that will enable a horse to go barefoot successfully. Some people are reporting good results spraying on Hoof Marvel before a trim to soften the hooves enough that you can trim them. More info at: http://www.deltahorsecare.com/page7.html
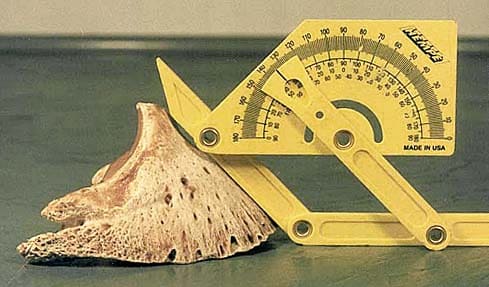
11. Make a hoof angle guide out of an 8" square piece of plexi-glass:
(The above thumbnail link is to a .pdf file; you will need Adobe Acrobat Reader to open it. If you already have Acrobat Reader, your browser may open this file automatically. The advantage to a .pdf file is that it should print correctly sized. To be certain, however, check that the heel height line on lower right of your printout is 3.5 cm. or 1-3/8" to 1-1/2" high from bottom.)
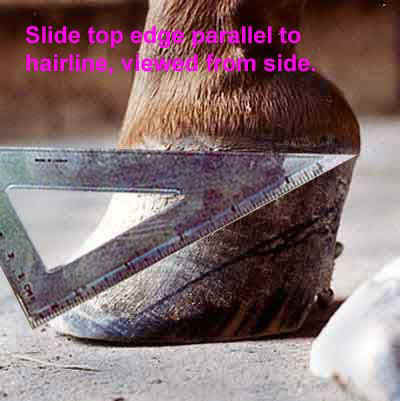
The 3.5 cm. guideline is how high the lateral cartilages are at the very rearmost point. You can hold the plexi-glass guide up to the hoof's side, sliding it backwards or forwards until you can line up the 30 degree hairline slope against your horse's hairline. This will help you sight your horse's hairline. If it is 30 degrees, then you should have the bottoms of the coffin bones ground-parallel. Then slide it back until the appropriate toe angle guideline (45 degrees for fores; 55 degrees for hinds) is lined up with the top of the hoof. With a rotated hoof, you will want to back up the point of breakover to where this line hits the ground. The gauge in use below:
(Photo courtesy of Denise McLain)
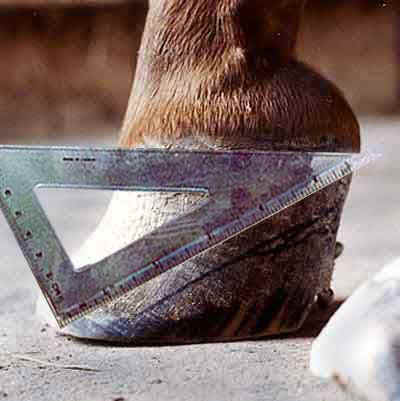
The upper heel height line (4 cm.) is aligned with the tops of the very rear of the lateral cartilage. The hairline is not quite at a 30 degree slope--the heels could come down a tiny bit. Then you would slide the plexi-glass gauge backwards until the 55 degree line lines up with the top of this hind foot. Any toe hitting the ground forward of where the guideline hits the ground needs to be backed up. As this hoof has some dishing, it does need to be backed up.
The upper heel height line (4 cm.) is aligned with the tops of the very rear of the lateral cartilage. The hairline is not quite at a 30 degree slope--the heels could come down a tiny bit. Then you would slide the plexi-glass gauge backwards until the 55 degree line lines up with the top of this hind foot. Any toe hitting the ground forward of where the guideline hits the ground needs to be backed up. As this hoof has some dishing, it does need to be backed up.
The reason we are looking for 45 and 55 degree angles is that these are the toe angles on most coffin bones when they are resting on the ground (ground-parallel):
Front coffin bone with a 45 degree toe angle.
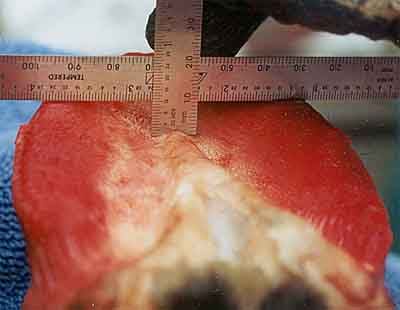
The reason we are looking for a concavity depth of about 1 cm. right in front of the tip of the frog is that this is the depth of a lot of coffin bones. Usually, there is not enough wall and sole in the toe area to achieve this. You have to wait for it to grow in, and trimming to set the hairline slope at 30 degrees (which should put the coffin bone bottoms ground-parallel) will enable this to happen much faster.
Measuring concavity depth of a coffin bone
just in front of where the tip of the frog would be.
Use the same technique to measure concavity depth on a live hoof.
If the goal of trimming is to get the hoof capsule to follow the form of the underlying structures, having the toe angles following the coffin bone toe angles is logical. In the case of a horse with rotation, restoring the point of breakover to where it would be with the coffin bone ground-parallel and the toe wall not rotated away from the coffin bone will require that the toe be backed up. Further, the point of breakover on mustangs living on hard terrain is even further back,
(Photo from Jaime Jackson's former newsletter.)
which is why I might back up breakover even more than it would be with the angles on the plexi-glass hoof gauge. Achieving breakover this far back on a rotated hoof can sometimes require a LOT of backing up of the toe profile if there is a lot of rotation.
(Photo, courtesy of Debbie Guelette)
Shortening toes by backing up breakover, rather than shortening from the bottom:
You can shorten the effective toe length considerably by backing up the breakover, without cutting into the toe area of the sole, which is often too thin in foundered horses:

Shortening toes by shortening from the bottom, rather than by backing up breakover, shortens the lever forces on the toe less, and leaves the tip of the coffin bone too unprotected because the sole is over-thinned in the toe:
Shortening toes by backing up breakover, rather than shortening from the bottom, still shortens the effective lever length of the toe on a hoof that has no rotation:
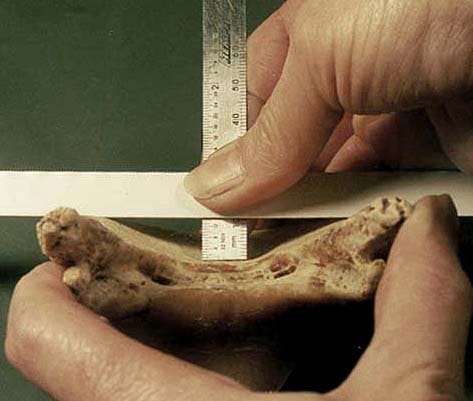
Another tool for determining how far to back up breakover is the Bergy gauge:
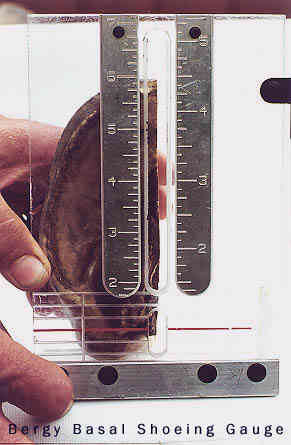
It does the math for you, and the red line is how far back the hoof wall's weight-bearing surface should be. This gauge is made by Balance Technologies and greatly facilitates calculating where to back up the toes according to Bergy's basal formula. To order, 715-228-2747 or 608-798-3233. Realistically, though, on a lot of average hooves, this spot where breakover begins is 1-1/4" to 1-1/2" (3.2 to 3.8 cm) ahead of the true apex of the frog.
You take a reading on the left-hand (smaller) ruler to the tip of the frog; the same measurement on the right-hand (larger) ruler is where the breakover ends. There is a piece along the bottom at 90 degrees to the sole plane, which you line up with the backs of the heel bulbs. While this is not is infallible as working with a set of x-rays, it is still useful. (This gauge is also more accurate than trying to guess where a plumbline dropped from the backs of the heel bulbs would be, which is where you measure from to the tip of the frog; divide this by 3, and the result is the distance from the tip of the frog to the point of breakover.) Bear in mind that on wild feet, the actual breakover point is is further back than the leading edge of the toe, due to the mustang roll undercutting the toe profile:
Once you determine the point of breakover, there are several ways to back it up. The Strasser way removes the least, but needs to be done the most often; the mustang roll removes more higher up, but needs be done less often; and the Bergy style removes more from higher up on the hoof capsule, and needs to be done the least often to remain effective:
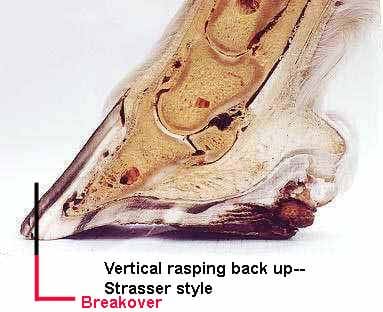
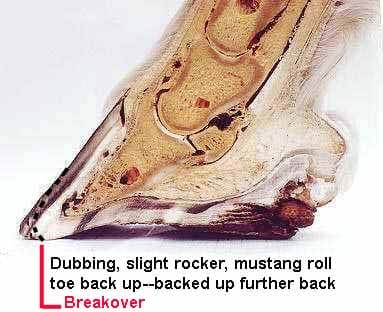
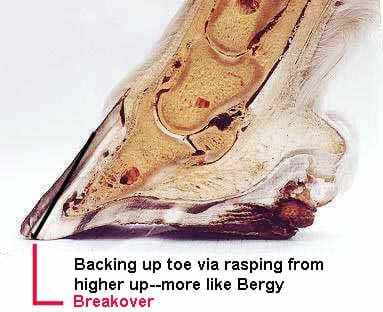
Before backup...and black lines showing backup Strasser style, mustang roll style, and Bergy style
Much has been made of the apparent differences in toe angles between what Dr. Strasser advocates and what Jaime Jackson's wild hoof studies. The differences shrink when you take into account that:
1. Strasser measures toe angles when the hoof is fully weighted; in this phase, the toe angle is lower than it is when the hoof is being held in the air, unweighted, to use a farrier's hoof protractor for measuring toe angles. Note hoof mechanism animation below:
2. Abrasive terrain is dubbing the toe walls on the wild horses, giving a higher apparent toe angle than the angle of growth really is.
Navicular horses--the same trim works on them, with the one exception of how the toes are treated. For foundered horses, you back the toe profile up more aggressively. For navicular horses, you would just do a mustang roll to the toe. The most common problems with navicular horses are high, folded over bars pushing up into the hoof capsule, putting pressure on the navicular area, high heels and heel contraction. Relieving these problems will often give surprisingly fast improvements.
For more on navicular, Click HERE
I continually hear arguments that lowering the heels of navicular horses will increase pressure on the navicular bone, and thus be counter-productive. The Pollitt video shows that this over-simplified pulley concept is not accurate. The Pollitt video shows that when the hoof is in full weight-bearing, the tendon is putting less pressure on the navicular bone than when there is less weight on the hoof. Further, this is the lesser of the problems. The greater amount of navicular pain results from:
1. The internal pressure from high bars being jammed up into the navicular area. To avoid this heel pain, the horse begins walking toe-first, which results in stumbling and faster heel growth. Soon he is "over at the knee."
2. High heels and bars preventing heel expansion on weight-bearing results in internal bruising because the foot is not flexible enough get out of the way of the coffin bone coming down a bit during weight-bearing, which is part of hoof mechanism.

Dissection of a contracted, navicular hoof with high bars.
Notice how bars are pushing up into hoof cavity.
This puts painful pressure on the navicular area.

Dissection of a contracted, navicular, but not rotated, hoof.
Note how narrow the frog is.

This hoof capsule shows contraction, and really high, impacted bars.

These specimens are also just air-dried, but the drying process did
not result in the bars reaching so high up into the hoof capsule.
The only difference between the navicular trim and the founder trim is that you can back up the toes less aggressively on hooves that are not rotated. I back up and finish the toe area with a mustang roll. Cross-section of a mustang hoof below, showing a mustang roll to the toe:
Mustang roll cross-section
Sketches of how I am trimming
(These are drawings of the trim for a foot that IS foundered. For a navicular hoof, only change the toe treatment to a mustang roll, which backs the toe up less aggressively than the founder trim.)
A New Trimming Video is available from Zen Equine on doing a basic Strasser trim on normal horses, covering many key points. Dr. Strasser demonstrates and comments while trimming in this video, which is quite professionally done. While this does not show trimming a foundered hoof, it is still well worth watching. The video, along with tools, clinic dates and online clinic registration, is available at:
www.strasserhoofcare.com
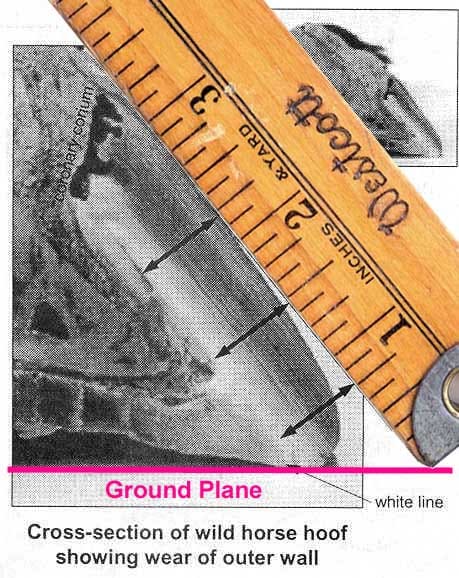
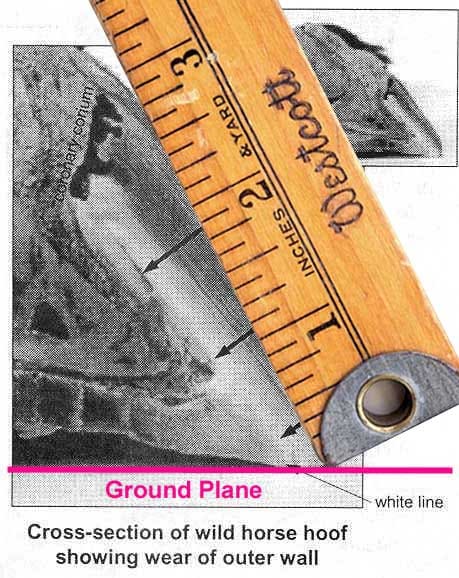
I have been questioned often on the apparent differences between the way Jaime Jackson and Dr. Strasser are trimming. In general, Jackson has higher toe angles, and does not trim the sole, bars and frog as much. However, the wild horse hooves that are his model ARE worn in the bars, frogs and soles by abrasive terrain into a shape that follows the shape of the underlying structure of the hoof...and his method depends in part on the horse getting enough movement on varied terrain to keep worn down more.
Wild feet--bars, frogs and soles trimmed by natural wear.
There are reasons for these differences based on the type of terrain the horses are adapting to. Jackson's trim is more geared to the hoof form that evolves in the type of terrain that the wild horses he studied lived in...hard, dry, rocky terrain the American Southwest. Dr. Strasser's trim is more similar to the shape of a hoof adapted to softer terrain. Further, she can get away with trimming more on her lameness patients in her clinic because the ground is not rocky.
Further, the apparently higher toe angles Jaime found among wild horses in the hard, dry, rocky terrain of the BLM mustangs he studied were actually in part due to the abrasive terrain slightly dubbing the toes:
Wild horse cross-section from Jaime Jackson's newsletter.
For an in depth discussion about the way different terrain results in different hoof forms by Dr. James Rooney, check out: http://www.cpb.uokhsc.edu/ojvr/hoof99b.htm
Another consideration for differing terrain: on soft terrain, you do not do a mustang roll all the way around the hoof. I just do a roll in the toe area, and a small vertical finishing cut on the quarters and heels, for a horse on soft terrain. If you roll the quarters and heels in soft terrain, it will lead to heel contraction. On hard terrain, however, you do a roll all the way around, including in the quarters and heels.
New!! Some photo case histories from the files of Dr. Strasser and Sabine Kells!
Progress in just 4 weeks at Dr. Strasser's clinic.
(More photos, even worse, of this donkey in the links below.)
It seems no case scares her off! :-)
Click here for Strasser cases, photos in thumbnail links (for faster download times)
Load times: 28.8K: 39 sec.---56K: 20 sec.---T1: .8 sec.
Click here for Strasser cases, photos full size (photos full size--better for print-outs)
Load times: 28.8K: 4.4 min.---56K: 2.2 min.---T1: 5.3 sec.
The information in these pages will help horse owners who do not have access to excellent farrier service to do their own work. It is not a a substitute for hands-on training, but it at least is an introduction to Dr. Strasser's trimming techniques. For feedback on how you are trimming, you can consult with Dr. Strasser's hoofcare specialists. Regrettably, Sabine Kells is getting too busy with the student caseload to take on more photo consultation cases.
Back to home page--Table of Contents
Article in sections with "thumbnail" photos for fastest downloads:
1 9 17
2 10 18
3 11 19
4 12 20
5 13 21
6 14 22
7 15 23
8 16 24
NAVICULAR
Article in sections with full-sized photos for print-outs:
1 9 17
2 10 18
3 11 19
4 12 20
5 13 21
6 14 22
7 15 23
8 16 24
NAVICULAR
To Strasser case studies--thumbnail photos for faster downloads
To Strasser case studies--large photos
Please sign my guest book! Photos of my pets My farm
Share Barefoot success stories on this page
Buy or sell used HORSE BOOTS Natural board Barn Listings
Click here to subscribe to naturalhorsetrim
(I moderate this listserv to weed out "fluff.")
Send Email to Gretchen Fathauer, or call (740) 674-4492
Copyright by Gretchen Fathauer, 2015. All rights reserved.